Tuesday, January 12, 2010

autoload ... no, really!

In my experience, about 2/3 of the time, the "autoload" feature of Maya plugins just doesn't seem to work. I load my plugin, check the box for autoload, save and close out Maya normally, re-open Maya, and ... the plugin is not loaded. Grrrr... I would look into it more deeply, except that it's easy to force a plugin to be loaded in each Maya session using userSetup.mel.

First, locate your userSetup.mel file. If it exists, it is located by default in the following directories:

[Windows] Documents and Settings\USERNAME\My Documents\maya\scripts\userSetup.mel
[Mac OS X] USERNAME/Library/Preferences/Alias/maya/scripts/userSetup.mel
[Linux] ~/maya/scripts
/userSetup.mel

If it doesn't exist you can either create it in the appropriate directory above or anywhere in your MAYA_SCRIPTS_PATH. Finally, in the userSetup.mel file, add the following line:

if(!`pluginInfo -q -l -n "PLUGIN_NAME"`) loadPlugin "PLUGIN_NAME";

Mental ray is notorious for not autoloading. Use the following line in userSetup.mel and mental ray and Maya will never forget to load mental ray ever again:

if(!`pluginInfo -q -l -n "Mayatomr"`) loadPlugin "Mayatomr";

You can also use this to autoload mel scripts as well. For example, assuming you have pelting tools installed in your scripts path, add the following line:

source "scripts/peltingToolsSetup.mel"

Monday, January 11, 2010

Texture from shader

Credit for this idea goes to Alfred, who posted the following at blenderartists.org: http://blenderartists.org/forum/showthread.php?t=174790

Have you ever created an awesome shader in one program and tried to replicate it in another? Here's a cheap, easy method to quickly get the look of a shader in one software package into another, with cheap rendering times to boot. All you need, in your target software package, is a method to import an image as a texture, and the ability to use that texture as a spherical environment mapping. Alfred discusses how to do it in Blender -- here's how to do it in Maya. First, find a shader ball representation of the shader you like (if there are reflective or surface texture details, try to get as high res an image as possible). Pixologic offers many shader ball renders you can try out at its MatCap library: http://www.pixologic.com/zbrush/downloadcenter/library/

First find a shader ball you like, and take a screenshot of it. Crop the image so that the sides of the sphere just touch the edges of the sphere, and try to make sure the background color is similar to the color of the edge of the sphere. When cropping, err on the side of cropping too much rather than too little in order to avoid an edge on your shader ball image. In other words, it is better to cut off a little of the sphere on the top, bottom, and sides than to leave a border around the sphere.


Next, in Maya, go to the Hypershade and under the Env Textures, create an Env Ball node. In the envBall's attributes, map the Image attribute by clicking the checkerboard icon, and map it to a file texture (file1.outColor -> envBall1.image). Load the cropped image into the file texture. Finally, pipe the output of the envBall into the color channel of a Surface Shader (envBall1.outColor -> surfaceShader1.outColor). Your final Hypershade tree should look something like this.


For far away renders that don't require a lot of detail, this technique works pretty well with very little overhead for set up and render time.


Of course, you may need to have reflections and refractions in addition to what is provided by the environment sphere image. This is relatively easy to do. Create a blinn shader, and pipe the environment ball output into the blinn's color attribute (envBall1.outColor -> blinn1.color). Try to match the blinn's transparency and specular colors to the colors in the texture image. If the reflections in the image are fuzzy, make the specular highlight larger. If the glass texture is very dark, use more transparency, and if the texture is lighter in color, use less transparency. You will also need to increase the ambient color to account for the double shading (once from the texture image, and once from Maya's blinn). For this image I have a pale dark green transparecy at about 15% brightness. If using Maya software be sure to turn on raytracing. Pretty good for nearly no render overhead, and this technique can be used for any shader ball image you come across.

Monday, January 4, 2010

Tweaking Maya Paint Effects Lightning

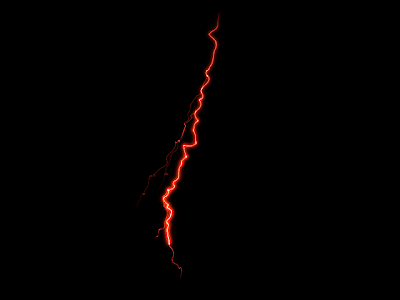
Maya paint effects provides a fantastic, easy way of creating decent-looking electricity effects in a 3D environment. One of paint effects' greatest advantages as that they render extremely quickly as a post process. However, this render time advantage severely limits the paint effects' capabilities. Luckily, Maya provides tools to get around many of these limitations.

In the Rendering Menu, do Paint effects -> Paint Effects Tool, then Paint effects -> Get Brush... In the electrical folder, choose lightningOrange.mel. Now in the viewport, draw a small curve, and a stroke of lightning will appear. Render this in Maya Software, and you get a nice stroke of lightning. Play your time line, and you'll see it's already set up for electrical animation.


Some limitations are immediately obvious: you can't render in Mental Ray, you can't deform the lightning in any way, and, probably worst of all, you can't easily control the opposite side of the paint effect that is not attached to the curve. This is irritating because, by default, the "source" end of the lightning is at this opposite side.

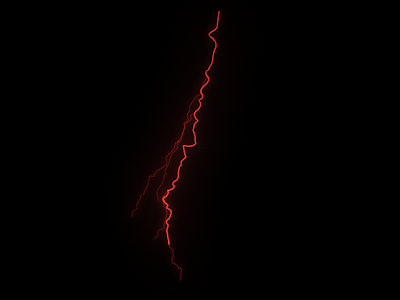
The first step to a more interactive lightning effect is converting to geometry. Select the paint effect stroke, and do Modify -> Convert -> Paint Effects to NURBS. Render again, and it will look slightly different, but at least you can now render in mental ray (Be sure to set the anti-alias settings high enough or you will get breaks in the thin geometry -- easiest way is to just use the Production quality preset). You can try to approximate the look of the original lightning bolt by tweaking the Shader Glow attributes (more on that later).


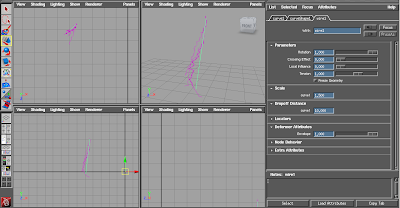
As geometry, you can do now manipulate it with deformers. A quick, dirty way of creating source and end "locators" is to use a control curve. Do Create -> EP Curve Tool options, and in the options select a Linear curve degree. Now place two points for the curve, and move the control points to the two ends of the lightning. Under the Animation menu, do Create Deformers -> Wire Tool. In the outliner, select the strokeShapeLightningOrange1Surfaces group node (the surfaces to deform), and press enter. Then select the curve1 curve (the wire deformer), and press enter. Now you have a curve whose 2 ends can be used to place your electricity effect.

There might be some issues with the deformer, depending on your default setup. Select your curve1, and in the Attribute editor select the wire1 tab to get attributes for the wire1 deformer. Increase the Dropoff Distance if any part of the lightning is "sticking" to its original position. Increase the Scale to increase the size of the lightning geometry and reduce the stretching effect. Push play in the timeline -- it's still animates fine!


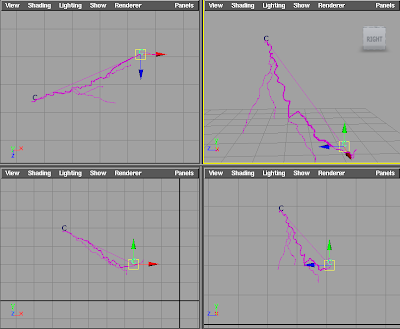
Now it's kind of irritating to have to get into component mode every time you want to move the lightning, so use Clusters to transform the curve CVs individually. Select one of the curve's CVs and do Create Deformers -> Cluster. Repeat for the second CV. Now you have two clusters to move the curve points of the lightning.


Finally, let's fix the look of the lighting. In the hypershade, select the Shader Glow node, and look at its attributes in the Attribute Editor. The first thing you should do immediately is turn off Auto Exposure. Under Glow attributes, set Glow intensity to 0.5, and Glow spread to 0.035. Under Halo attributes, set Halo intensity to 1.0 and Halo spread to 0.1. Use these as a starting point for your own tweaks. You can change the color of the lightning mainly by changing the color of the Incandescence on the lightningOrange1Shader node.

Saturday, December 12, 2009

Batch Render in renderView

Have you ever run into a Maya scene that renders fine in the render view window, but absolutely refuses to batch render correctly? One would think they would produce the same results, but I've had a lot of scenes which would render perfectly fine as a single frame, and then go horribly wrong when I tried to batch render.

Luckily, it's simple to write a MEL script that sets up a pseudo-batch render in the render view. Before you do this, a few warnings:

1. Make sure you save your file before you execute this render!
2. Once you start this render, you won't be able to stop it, so double check and make sure all your render settings are correct before executing.
3. Make sure you get the start and end frame numbers correct, because, once again, when this render starts you can't stop it.
4. The rendered images will appear in your current project's images/tmp directory. I recommend deleting everything else in the tmp directory before starting to make it easy to find the images.
5. SAVE YOUR FILE

Here's the script. Suppose, for example, you want to do a render view batch render for frames 101 through 200:

int $i;
for ($i = 101; $i <= 200; $i++){
currentTime $i;
RenderIntoNewWindow;
}

Easy, huh? As mentioned, the images will appear in the image/tmp directory of your current project. Oh, and you won't be able to stop it. Even if you push Esc to end the render, the script will execute the next frame. Thus, in the example above, the only way to get back to Maya is to push Esc 100 times! Or quit Maya. Hopefully you saved your file beforehand. Good luck with your renderings, hope this little script helps you out--it's certainly saved me on many occasions.

Saturday, November 14, 2009

MEL scripting trickery Part I

MEL is frickin annoying!!! There are so many irritating things in MEL I can't even begin to start. Maya's use of Python is certainly a godsend, except for one minor detail -- the foundation is still MEL. So now we basically have to write MEL in Python, which is an entire learning adventure in itself.

Anyway, here are solutions to some problems that I personally lost sleep over when I was starting out learning MEL and Maya.

Problem 1: Resolving variable names within a script

Imagine this scenario. You are trying to create a cute MEL script to automate the creation of some objects, and you ... just ... can't! Why, why, WHY does this not work???

// attempt # 1
$mySphere = `polySphere`;
$mySphere.scaleX = 3;

The docs say to use setAttr. Fine.

// attempt # 2
$mySphere = `polySphere`;
setAttr $mySphere.scaleX = 3;

Oh! I see, setAttr actually takes two arguments, the attribute to set and the value to set it to. It doesn't take an equation with the equals sign. Okay, now it's got to work, right??

// attempt # 3
$mySphere = `polySphere`;
setAttr $mySphere.scaleX 3;

YES! No syntax error! But ... still not working. We get the mysterious, annoying, USELESS error: No attribute was specified. By now you are probably not caring why it doesn't work, you just want some hack to fix this problem and be done with it. So you turn to your trusty eval command, which allows you to evaluate a string as if it were a MEL command. Gettin ugly ....

// attempt # 4
$mySphere = `polySphere`;
$commandString = "setAttr " + $mySphere + ".scaleX 3";
eval($commandString);

Haha, now we get not one error, but two. Give up yet? Ok, so this last attempt was almost correct. The problem with MEL is that sometimes it inexplicably returns you a string array instead of a string, even though the string array has only one item in it. So technically, this works:

// attempt # 5
$mySphereStringArray = `polySphere`;
$mySphereString = $mySphereStringArray[0];
$commandString = "setAttr " + $mySphereString + ".scaleX 3";
eval($commandString);

Wow. That looks ugly as all hell. While attempt #5 works, the code shows someone who kept fiddling with code until it worked instead of trying to understand the underlying problem. First of all, find out if the attribute can be set during creation. Go to your MEL command reference and look up the attributes for polySphere. Hmm, doesn't seem like there are any flags that can help us set the scaleX before the object is created. Fine.

And that brings us to the correct, MELish way to do it. Here is where we wish and wish MEL could be more like Python, but it just isn't. MEL can resolve variables and execute commands, but it can't do both at the same time :( If you look at attempt 3 above, this was the closest to the actual solution. In the second line of code, you are trying to resolve a variable and execute a command at the same time, and Maya gets confused (and that seems to happen very often).

// attempt # 6 -- the right way

$mySphereStringArray = `polySphere`;
setAttr ($mySphereStringArray[0] + ".scaleX") 3;

We've separated the job of resolving the variable name and executing the command by using a parenthetical expression. The parenthetical expression assembles a string from the string array $mySphereStringArray that is used as the first argument for setAttr (the attribute to change). The second argument is 3, the value to change the attribute to. No eval() needed.

Hope this helps. Let me know if you have any other weird issues with MEL syntax. More on this in future posts.

I'm not an arrogant prick, really!

Ok, so I know the title of this blog sounds extremely pretentious -- who am I to assume that I am some member of a computer graphics cognoscenti? I, Jonathan King, who have worked in the computer graphics industry for less than a couple years.

So first off, let me clear up any misunderstanding -- this is not a "Look at me" blog. Far from it. The reason I'm writing this blog is to catalog my "Aha!" moments. Those moments when I discover something either on my own or with the help of other people that is not obvious and I'm sure would trip up other people who didn't know.

How many times have you tried to solve a problem in CG, and you slave over it day and night, obsessing over this stupid little thing that should work but for some reason doesn't, only to have someone casually peek over your shoulder and say, "Oh, it's not working because you didn't do this, this and this." Just like that -- if only you had known that a week ago!

This blog is for those people. My goal is to reduce some frustration and help CG artists get on with what they do best -- creating awesome work. Good luck everyone!